مدتی پیش در tabriz.io بخشی را تحت عنوان آکادمی فنی ایجاد کردیم. از هم اکنون می خواهیم در این بخش، دوره آموزشی استفاده از میکروکنترلر های AVR را آغاز کرده و قدم به قدم پیش ببریم.
AVR، نامیست که تمامی دانشجویان رشته های مهندسی برق و الکترونیک و مهندسی سختافزار آن را شنیدهاند. این نشان تجاری، به گروهی از میکروکنترلر ها اطلاق میشود که بنا به معماری سخت افزاری و ویژگی های فنی خود، انتخاب اول برای بسیاری از پروژه های آموزشی دانشجویی، دوره های آموزش مبانی الکترونیک و روباتیک و بسیاری از پروژه های سختافزاری محسوب میشوند. از امروز در آکادمی فنی tabriz.io، قصد داریم از ابتدای راه، روش راه اندازی، برنامه نویسی و توسعه میکروکنترلر های AVR را قدم به قدم فرا بگیریم.
قبل از هر چیز، اجازه دهید مشخص کنیم که این دوره آموزشی به چه صورتی ارائه می شود و قرار است به درد چه کسانی بخورد. برای آن که بتوانید از این دوره استفاده کنید، احتیاجی به پیش نیاز های تخصصی مثل تسلط به زبان های برنامه نویسی و طراحی سختافزار الکترونیکی ندارید، چون قرار است این موارد را به تناسب نیاز در طول دوره مرور کنیم. مهم ترین موارد لازم، علاقه و اعتماد به نفس برای شروع و انرژی برای ادامه هستند. در صورتی که با مفاهیمی بسیار ابتدایی مثل وظیفه پردازنده و حافظه موقت و دائمی و مفهوم بیت و بایت آشنایی دارید و می خواهید با دنیای جدیدی که تلاقی الکترونیک و برنامه نویسی است آشنا شوید، آماده شوید که میخواهیم شروع کنیم!
خب، سؤالی که ممکن است در ابتدا برایتان پیش آمده باشد، این است که اصلاً میکروکنترلر چیست؟ میکروکنترلر ها چیپ های فیزیکی هستند که از پردازنده مرکزی، حافظه رم، حافظه Flash، پورت های ورودی و خروجی و در کل، هر چیزی که برای ساخت یک کامپیوتر مورد نیاز است، تشکیل شدهاند. ابعاد میکروکنترلر های رایج به ندرت از یکی دو سانتی متر مربع بالاتر میرود، و قدرت آن ها هم متناسب با اندازه آن هاست. البته ممکن است توان پردازشی و منابع ذخیره سازی آن ها به نظر اندک بیاید، اما کاملاً برای وظیفه ای که برای آن ساخته شده اند مناسب است. احتمالاً تا کنون حدس زده اید که در عمل، میکروکنترلر ها ترکیبی از سختافزار و نرمافزار هستند، یعنی شما با زبان برنامه نویسی مناسب، دستورات مورد نظرتان را نوشته و کامپایل میکنید، دستوراتتان را در حافظه میکروکنترلر آپلود میکنید و میکروکنترلرتان با قرار گرفتن در مدار الکترونیکی، دستورات را اجرا میکند.
اگر میخواهید در مورد کاربرد های این ابزار بدانید، باید بگوییم که درون تقریباً تمامی ابزار های هوشمند ریز و درشتی که در اطرافمان هستند، میکروکنترلر به کار رفته، از پروژه های سختافزاری رنگارنگ KickStarter و لوازم الکترونیکی مجهز به اینترنت اشیاء گرفته تا ماشین های لباسشویی هوشمند و حتی پرینتر های سه بعدی که دست بر قضا اخیراً ساختنشان حسابی در کشورمان باب شده است. در واقع، هر جایی که به قدرت پردازشی زیادی نیاز نبوده و کنترل چند قطعه سخت افزاری و ارسال و دریافت داده های کم حجم، کار را راه بیندازد، تنها گزینه موجود استفاده از میکروکنترلر است.
می دانید، دنیای میکروکنترلر ها دنیای بزرگ و گسترده ایست. توسعه دهندگان نرمافزار و وب، بر این موضوع واقفند که دنیای برنامهنویسی، چه پیچیدگی ها و تنوع ها و البته چه لذت هایی دارد. اگر به این ها، پیچیدگی ها و لذت های دنیای الکترونیک را هم اضافه کنید، می بینید که نمی توان در عرض چند هفته، همهی چم و خم برنامه نویسی و توسعه سخت افزار را آن هم به صورت هم زمان یاد گرفت، اما به شما قول می دهیم که با حفظ سادگی، این مسیر را قدم به قدم طی کنیم.
این را هم اضافه کنیم که میکروکنترلر ها برای ارتباط با دنیای خارج، پورت USB و صفحه نمایش ندارند، در عوض از استاندارد های ارتباطی دیگری استفاده میکنند که همه این روش ها از طریق پین ها (پایه های فلزی که به بدنه شان متصل شده است) اجرا میشوند. می توانید از استاندارد های ارتباط سریال برای اعمال "پالس" های شناخته شده استفاده کنید، یا خودتان به صورت دستی، پالس ایجاد کنید. اگر این اصطلاحات برایتان نامأنوس هستند نگران نباشید، در ادامه به طور کامل به بحث این موارد و ورودی و خروجی ها خواهیم پرداخت.
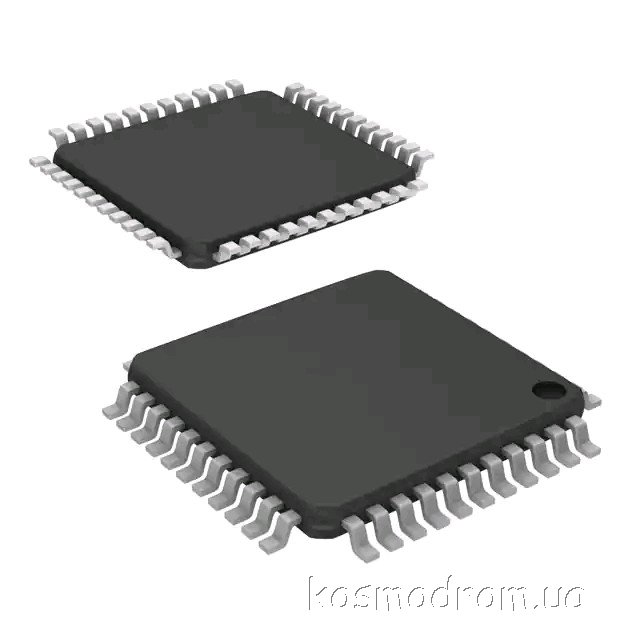 یک میکروکنترلر در پکیج SMD
حال که کمی با ماهیت میکروکنترلر آشنا شدیم، باید بدانیم که AVR چیست و چرا میکروکنترلر های AVR را برای این دوره انتخاب کردهایم. میکروکنترلر ها انواع مختلفی با معماری های مختلف دارند. در صورتی که دانشجوی رشته مهندسی برق باشید، به احتمال زیاد نام هایی مثل 8051، ARM و PIC به گوشتان خوردهاند. قصد نداریم کل تاریخچه میکروکنترلر ها و ویژگی های فنی انواع مختلف آنها را بررسی کنیم، اما بد نیست اگر به طور خلاصه با رایج ترین انواع آن ها آشنا شوید.
شناخته شده ترین انواع میکروکنترلر ها، با نام های ARM، PIC و AVR مشخص میشوند. تفاوت این سه گروه در معماری سختافزاری، منابع سخت افزاری، روش برنامه نویسی، میزان پایداری و اصطلاحاً نویز پذیری و مواردی از این قبیل هستند. میکروکنترلر های ARM، از دو دسته دیگر در سطح بالاتری قرار می گیرند. توان پردازشی بالایی داشته و حافظه زیادی در اختیار کاربر قرار میدهند. همچنین، این میکروکنترلر ها 32 بیتی بوده و نویز پذیری بسیار کم تری نسبت به انواع دیگر دارند. در واقع، برای پروژه های تجاری و سطح بالا، ARM انتخاب اول مهندسان محسوب میشود. انواع PIC و AVR، قدرت و پایداری کم تری داشته و در عوض، قیمت ارزانتری دارند. اکثر تفاوت های مابین معماری های PIC و AVR، مربوط به حوزه هایی میشوند که قصد نداریم فعلاً آن ها را بررسی کنیم. مثلاً پردازنده PIC تنها میتواند 256 بایت حافظه رم را به طور مستقیم مدیریت کند، در حالی که پردازنده AVR، قادر است تا 64 کیلوبایت حافظه را بدون مشکل آدرس دهی کند.
اما چرا AVR را انتخاب کردیم؟ واقعیت این است که علاوه بر مزیت های فنی، حداقل در ایران AVR بسیار بیشتر مورد استفاده قرار میگیرد. این یعنی منابع رفع اشکال، رفع خطا، کد های آماده آموزشی و سختافزار و نرمافزار های سازگار بسیار بیشتری برای AVR پیدا خواهید کرد. و البته با یادگیری صحیح و کامل نحوه کار با میکروکنترلر های AVR، خواهید توانست به سادگی کار با سختافزار های پیچیده تر مثل ARM را فرا بگیرید.
میکروکنترلر های AVR، ساخته شرکت Atmel بوده و خود به دسته های مختلفی مانند ATxmega، ATmega، ATtiny و AT90S تقسیم میشوند که هر یک مزایا و معایب مختص خود را دارند. برای مثال، ATxmega قدرت و انعطاف بیشتری داشته و قیمت بالاتری دارد، در حالی که ATtiny، قیمت فوقالعاده پایین و قدرت کمتری نسبت به ATmega و ATxmega داشته و با توجه به توان پردازشی خود، برای پروژه های کوچک انتخاب مناسبیست. در این دوره، ما از یک میکروکنترلر AVR ATmega32A استفاده خواهیم کرد که از تمامی امکانات مورد نیازمان بهره میبرد، کار با آن ساده بوده و قیمت مناسبی نیز دارد.
 میکرو کنترلر ATmega32 در پکیج DIP
اجازه دهید سخن کوتاه کنیم و با بیان تجهیزات مورد نیاز برای اولین جلسه، مقدمه را به پایان برسانیم. با توجه به اینکه قرار است با سخت افزار کار کنیم، باید تجهیزاتی در اختیار داشته باشید تا به مرور که در دوره پیش می رویم، یادگیری های خود را در عمل مورد آزمایش قرار دهید و از تسلط خود اطمینان پیدا کنید. البته ممکن است بدون این تجهیزات هم بتوانید کاملاً موارد گفته شده را فرا گیرید، یا حتی از نرمافزار های شبیه ساز مانند Proteus استفاده کنید (در پایان دوره، به نحوه کار با این شبیه ساز خواهیم پرداخت)، اما هیچ چیز جای تجربه عملی را نمیگیرد. بنابراین، بهتر است برای جلسه بعد، تجهیزات زیر را در اختیار داشته باشید:
علاوه بر این قطعات، نیاز به یک محیط برنامه نویسی در کامپیوتر و نرمافزاری برای انتقال کد های آماده شده به میکروکنترلر (اصطلاحاً پروگرمینگ) هستیم. به عنوان محیط برنامه نویسی، از CodeVisionAVR نسخه 3 و برای پروگرم کردن میکروکنترلر، از نرمافزار ProgISP استفاده خواهیم کرد.
در صورتی که در حال حاضر تجهیزات گفته شده را ندارید، میتوانید آن ها را از فروشگاه های الکترونیک فیزیکی یا آنلاین تهیه کنید. در جلسه بعد، نحوه کار با این قطعات را نیز به طور مختصر توضیح داده و کار با میکروکنترلر های AVR را شروع میکنیم.
این هم از مقدمه دوره آموزشی کار با میکروکنترلر های AVR. امیدواریم که این دوره برایتان کاربردی باشد و از آن لذت ببرید. پس تا هفته بعد و اولین جلسه، بدرود!
Some time ago, we created a section titled Technical Academy on tabriz.io. From now on, we want to start the training course on using AVR microcontrollers in this section and proceed step by step.
AVR is a name that all students in electrical engineering, electronics, and hardware engineering have heard of. This brand refers to a group of microcontrollers that, due to their hardware architecture and technical features, are the first choice for many student educational projects, basic electronics and robotics training courses, and many hardware projects. Starting today at the Technical Academy of tabriz.io, we intend to learn step by step how to set up, program, and develop AVR microcontrollers from the very beginning.
First of all, let’s clarify how this training course will be presented and who it is intended for. To benefit from this course, you do not need specialized prerequisites such as mastery of programming languages and electronic hardware design, as we will review these topics as needed throughout the course. The most important requirements are interest, confidence to start, and energy to continue. If you are familiar with very basic concepts such as the function of the processor and temporary and permanent memory, as well as the concept of bits and bytes, and you want to get acquainted with a new world that intersects electronics and programming, get ready because we are about to start!
Well, the question that may have arisen for you at first is, what exactly is a microcontroller? Microcontrollers are physical chips that consist of a central processor, RAM, Flash memory, input and output ports, and basically everything needed to build a computer. The dimensions of common microcontrollers rarely exceed one or two square centimeters, and their power is proportional to their size. Although their processing power and storage resources may seem limited, they are perfectly suitable for the tasks they are designed for. You have probably guessed by now that in practice, microcontrollers are a combination of hardware and software, meaning you write and compile your desired commands using the appropriate programming language, upload your commands to the microcontroller's memory, and your microcontroller executes the commands when placed in an electronic circuit.
If you want to know about the applications of this tool, we should say that almost all smart devices, big and small, around us use microcontrollers, from colorful hardware projects on KickStarter and IoT-enabled electronic devices to smart washing machines and even 3D printers, which have recently become quite popular in our country. In fact, wherever high processing power is not needed and controlling several hardware components and sending and receiving small data packets can get the job done, the only option available is to use a microcontroller.
You know, the world of microcontrollers is a vast and extensive one. Software and web developers are aware of the complexities, diversities, and of course, the joys of the programming world. If you add to these the complexities and joys of the world of electronics, you will see that it is not possible to learn all the intricacies of programming and hardware development simultaneously in just a few weeks, but we promise you that we will take this path step by step while keeping it simple.
Let’s also add that microcontrollers do not have USB ports or displays for communication with the outside world; instead, they use other communication standards, all of which are executed through pins (metal legs connected to their body). You can use serial communication standards to apply known "pulses," or you can manually create pulses. If these terms are unfamiliar to you, don’t worry; we will discuss these topics and inputs and outputs in detail later.
A microcontroller in SMD package
Now that we are somewhat familiar with the nature of microcontrollers, we need to know what AVR is and why we have chosen AVR microcontrollers for this course. Microcontrollers come in various types with different architectures. If you are an electrical engineering student, you have likely heard names like 8051, ARM, and PIC. We do not intend to review the entire history of microcontrollers and the technical features of their various types, but it would be good to briefly familiarize yourself with the most common types.
The most well-known types of microcontrollers are identified by the names ARM, PIC, and AVR. The differences between these three groups lie in hardware architecture, hardware resources, programming methods, stability, noise susceptibility, and similar factors. ARM microcontrollers are positioned at a higher level than the other two categories. They have high processing power and provide a lot of memory to the user. Additionally, these microcontrollers are 32-bit and have much lower noise susceptibility compared to other types. In fact, for commercial and high-level projects, ARM is the first choice of engineers. PIC and AVR types have less power and stability but, in return, are cheaper. Most of the differences between the architectures of PIC and AVR relate to areas we do not intend to review at this time. For example, the PIC processor can only directly manage 256 bytes of RAM, while the AVR processor can address up to 64 kilobytes of memory without issues.
But why did we choose AVR? The reality is that, in addition to technical advantages, AVR is much more widely used, at least in Iran. This means you will find many more debugging resources, error fixes, ready-made educational codes, and compatible hardware and software for AVR. And of course, by learning the correct and complete way to work with AVR microcontrollers, you will easily be able to learn to work with more complex hardware like ARM.
AVR microcontrollers are made by Atmel and are divided into various categories such as ATxmega, ATmega, ATtiny, and AT90S, each with its own advantages and disadvantages. For example, ATxmega has more power and flexibility and is more expensive, while ATtiny is extremely low-cost and has less power compared to ATmega and ATxmega, making it a suitable choice for small projects based on its processing power. In this course, we will use an AVR ATmega32A microcontroller, which has all the necessary features, is easy to work with, and is reasonably priced.
ATmega32 microcontroller in DIP package
Let’s keep it brief and conclude the introduction by stating the equipment needed for the first session. Since we will be working with hardware, you need to have equipment available so that as we progress through the course, you can test your learnings in practice and ensure your mastery. Of course, it may be possible to fully learn the mentioned topics without this equipment, or even use simulation software like Proteus (we will cover how to work with this simulator at the end of the course), but nothing replaces practical experience. Therefore, it is better to have the following equipment ready for the next session:
In addition to these components, we need a programming environment on the computer and software to transfer the prepared codes to the microcontroller (commonly referred to as programming). As a programming environment, we will use CodeVisionAVR version 3, and for programming the microcontroller, we will use the ProgISP software.
If you currently do not have the mentioned equipment, you can obtain them from physical or online electronics stores. In the next session, we will briefly explain how to work with these components and start working with AVR microcontrollers.
This concludes the introduction to the AVR microcontroller training course. We hope this course will be useful for you and that you enjoy it. So until next week and the first session, goodbye!

دیدگاهها Comments 5