در بخش مقدمه آموزش کار با میکروکنترلر های AVR قدری با این چیپ های دوست داشتنی و نمونه های مشابه آن ها آشنا شدیم. حال می خواهیم به صورت عملی، کار با آن ها و نحوه استفاده از آن ها در پروژه های واقعی را فرا بگیریم.
گفتیم که میکروکنترلر ها قطعه ای سختافزاری هستند که برای کار، باید یک کد نرمافزاری روی حافظه آن ها آپلود شود تا پردازنده بتواند این دستورات را اجرا کند. بنابراین، باید یک محیط برنامه نویسی برای نوشتن و کامپایل کردن کد و ابزاری برای آپلود کد بر روی میکروکنترلر (همان پروگرمینگ) داشته باشیم. به عنوان محیط برنامه نویسی، نرمافزار CodeVisionAVR را انتخاب کردیم. کدویژن یک IDE یا محیط برنامه نویسی کامل است که تمامی امکانات مورد نیاز برای توسعه میکروکنترلر های AVR را در اختیارمان قرار میدهد. در واقع، حتی عمل پروگرمینگ را هم میتوانیم داخل محیط کدویژن انجام دهیم، اما به دلیل این که برای سهولت استفاده، از سختافزار پروگرمر USB ASP استفاده کردیم و برای جلوگیری از پیچیدگی های شناساندن پروگرمر به کدویژن، از نرمافزاری اختصاصی برای پروگرم کردن میکروکنترلرمان استفاده میکنیم، یعنی ProgISP. پروگرمر USB ASP نیز یک پروگرمر بسیار رایج و پر استفاده است که از طریق پورت USB به کامپیوتر متصل میشود. در صورتی که اندکی بر دنیای AVR تسلط پیدا کنید، می توانید خودتان هم یکی بسازید. تا آن زمان، توصیه مان این است که از نمونه های آماده در بازار استفاده کنید.
خب، پس از اینکه ProgISP و CodeVisionAVR را نصب و فعال کردید، باید درایور مورد نیاز برای پروگرمر USB ASP را دانلود و نصب کنید. مراحل نصب درایور به این صورت خواهد بود:
نصب درایور USB ASP Programmer در ویندوز 8، 8.1 و 10
اگر نسخه ویندوز شما نسخه 8 و بالاتر باشد، باید پیش از نصب، ویندوز را به ترتیب زیر آماده نصب درایور کنید:
ابتدا وارد Control Panel / Settings شوید و سپس به قسمت Recovery Option بروید. در این بخش، زیر Advanced Startup، روی گزینه Restart Now کلیک کنید.
پیش از صفحه بوت و لود شدن ویندوز با صفحه ای آبی مواجه خواهید شد. در این صفحه، بر روی Troubleshoot کلیک کرده و در صفحه جدید، Advanced Options را انتخاب نمایید. در این قسمت، باید Startup Settings را انتخاب کرده و سپس بر روی کلید Restart کلیک کنید.
پس از ریستارت شدن، با صفحه ی آبی دیگری رو به رو می شوید که طبق توضیحات صفحه، باید با فشردن کلید 7 کیبرد، Driver signature enforcement را غیر فعال کرده و وارد ویندوز شوید.
با انجام مراحل فوق، می توانید درایور USB ASP را به طور طبیعی روی ویندوز نصب کنید.
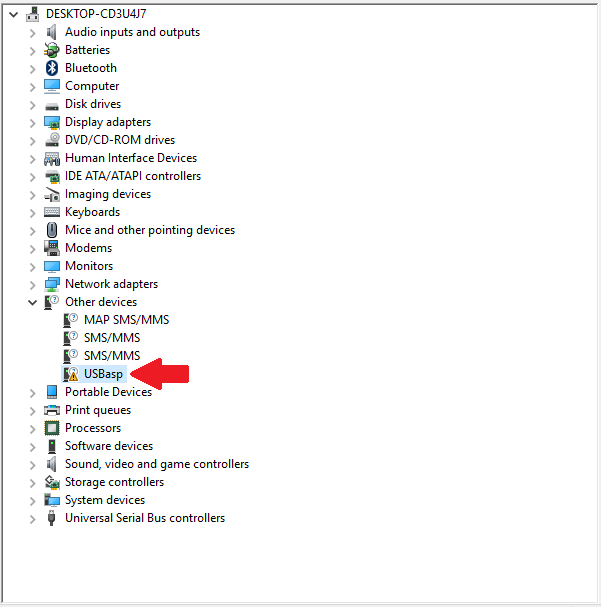
برای نصب درایور، پروگرمرتان را به پورت USB کامپیوتر متصل کنید. پس از اینکه فایل فشرده درایور را اکسترکت کردید، وارد کنترل پنل ویندوز و سپس قسمت Device Manager شوید. اگر همه چیز بدون مشکل پیش رفته باشد، باید گزینه ای مطابق تصویر پایین داشته باشید:
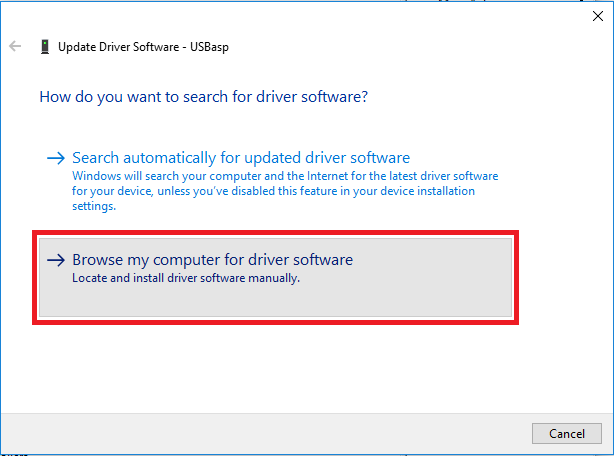
روی آیکن پروگرمر راست کلیک کنید و Update Driver Software… را انتخاب کنید. در این بخش نیز گزینه Browse my computer for driver software را انتخاب کنید.
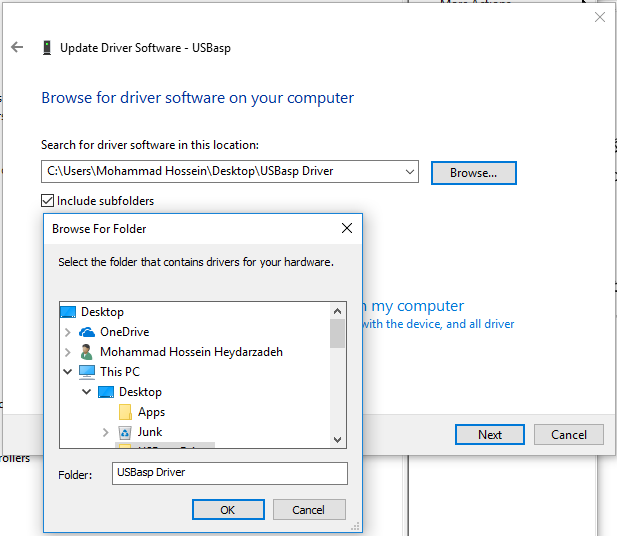
حال آدرس پوشه ای که فایل های درایور USP ASP در آن قرار دارند را به صورت دستی وارد کنید یا با گزینه Browse، مسیر آن را مشخص کنید. دقت کنید که گزینه Include Subfolders فعال باشد.
ممکن است با پیغام اخطاری از سوی ویندوز رو به رو شوید. در این صورت، روی گزینه Install this driver software anyway کلیک کنید.

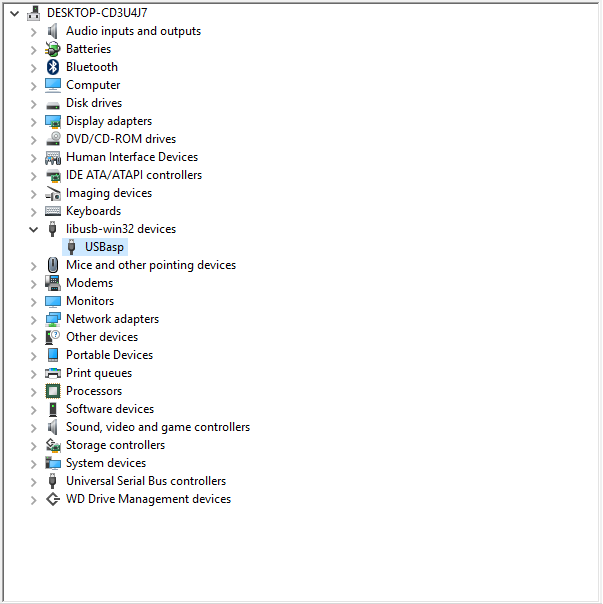
اگر همه چیز به خوبی پیش رفته باشد، درایور USP ASP نصب خواهد شد و می توانید پروگرمرتان را در Device Manager مشاهده کنید.
نصب درایور USB ASP Programmer در ویندوز 7
نصب درایور در ویندوز 7، تفاوت خاصی با ورژن های جدید تر ندارد، با این تفاوت که در ویندوز 7، نیازی به غیر فعال کردن ویژگی Driver signature enforcement نیست، بنابراین می توانید به سادگی از طریق Control Panel اقدام به نصب درایور به روش گفته شده نمایید.
تست پروگرمر
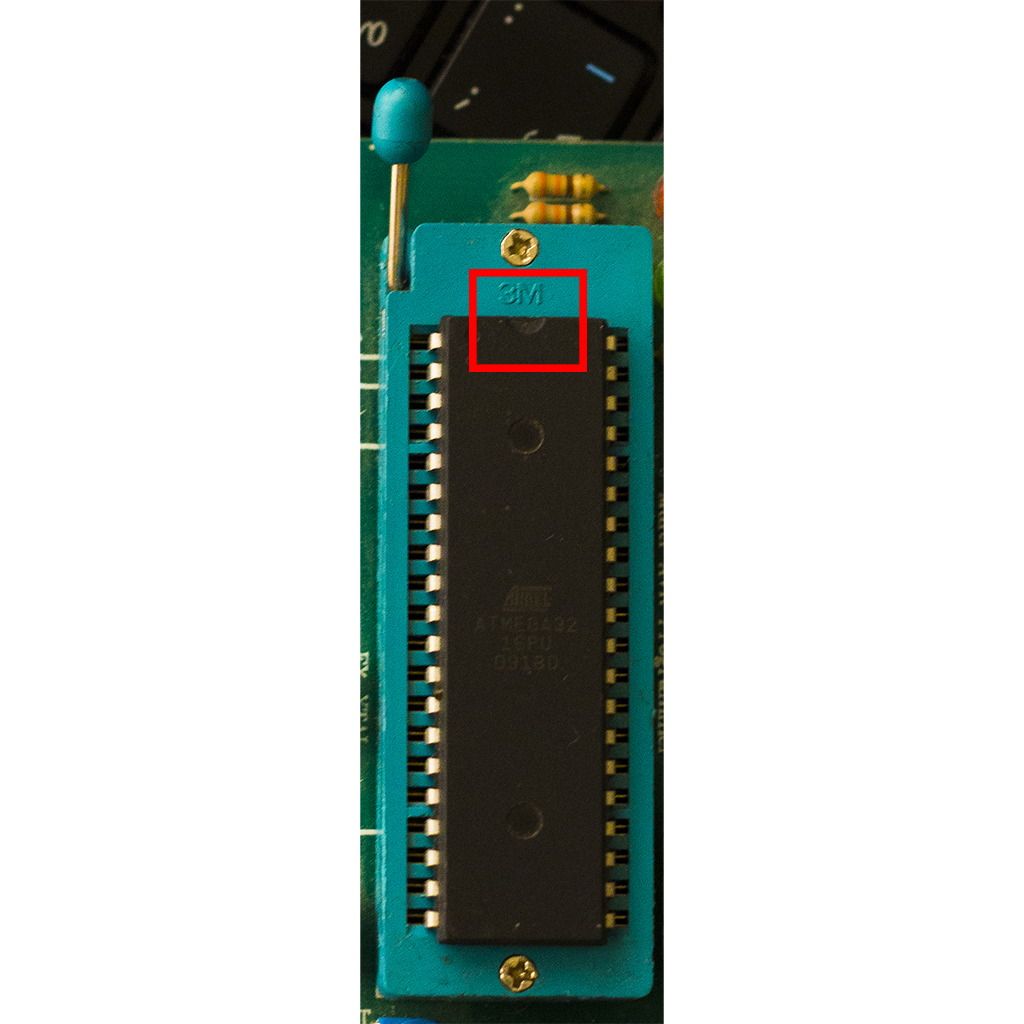
خب، حالا که درایور پروگرمر را نصب کرده اید، وقت آن است که از کارکرد صحیح پروگرمر و میکروکنترلرتان اطمینان حاصل کنید. برای این کار، میکروکنترلر را در جهت صحیح (به طوری که نیم دایره بالای آن نزدیک به اهرم سوکت سبز رنگ قرار گیرد) بر روی پروگرمر قرار دهید. اهرم را پایین بیاورید تا میکروکنترلر در جای خود ثابت شود.
نرمافزار ProgISP را بر روی کامپیوتر اجرا کنید و اگر پروگرمر به کامپیوتر وصل نیست، وصلش کنید.
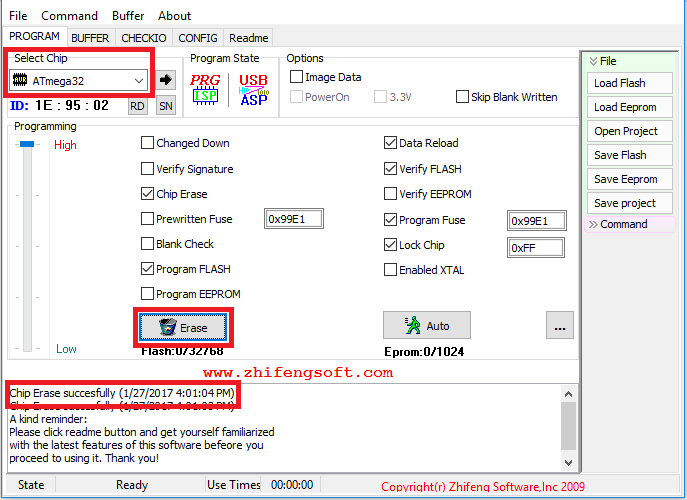
حالا باید مدل میکروکنترلتان از منوی سمت چپ – بالای نرمافزار انتخاب کنید. دقت کنید که مدل انتخابیتان دقیقاً با مدل ثبت شده بر روی میکروکنترلر برابر باشد. در صورتی که همه مراحل را به طور صحیح انجام داده باشید، با کلیک بر روی Erase، باید با پیغام Chip Erased Successfully مواجه شوید.
تبریک!! میکروکنترلر شما کاملاً آماده برنامه ریزی است. اما قبل از اینکه وارد بحث برنامه نویسی و کامپایل کردن کد شویم، بیایید ببینیم در ادامه قرار است چه اتفاقی برای میکروکنترلرمان بیفتد.
همانطور که گفتیم، نرمافزار کدویژن، یک محیط کامل برنامه نویسی بوده که میتوان با استفاده از آن، تمامی اعمال مربوط به توسعه میکروکنترلر های AVR را انجام داد. اما برای اینکه درگیر پیچیدگی های شناسایی مستقیم پروگرمر توسط CodeVisionAVR نشویم، ترجیح دادیم عمل پروگرمینگ را با یک نرمافزار مستقل انجام دهیم.
احتمالاً می دانید که زمانی که کد های یک برنامه نوشته میشوند، کامپایلر این کد ها را به زبان ماشینی که قرار است روی آن اجرا شوند، ترجمه میکند و یک فایل خروجی به کاربر میدهد. برای مثال، این فایل خروجی در برنامه های ویندوز پسوند .exe دارند. دقیقاً به همین ترتیب، کدویژن قرار است کد هایی که ما به زبان C مینویسیم، کامپایل کرده و یک فایل خروجی با پسوند .hex به ما بدهد. این فایل، یک فایل متنی با محتوای 16 بیتی (hex مخفف hexadecimal است) بوده که برای میکروکنترلر قابل اجراست. بنابراین، ما این فایل را برای اجرا، توسط نرمافزار ProgISP و پروگرمر، در حافظه میکروکنترلر آپلود میکنیم. نحوه کار با کدویژن، نوشتن کد های مناسب، کامپایل کردن و پروگرمینگ را به طور کامل در جلسات بعدی مورد بررسی قرار خواهیم داد.
جلسه اول آموزش در اینجا به پایان میرسد. امیدواریم از آن لذت برده باشید و برایتان مفید بوده باشد. حتماً نظرات، انتقادات و پیشنهادات خود را در بخش نظرات برایمان بیان کنید تا بتوانیم این آموزش را هر چه بیشتر قابل استفاده تر و مفید تر سازیم.
In the introduction section of the training on working with AVR microcontrollers, we got a bit familiar with these lovely chips and their similar counterparts. Now we want to learn practically how to work with them and how to use them in real projects.
We mentioned that microcontrollers are hardware components that require a software code to be uploaded to their memory in order for the processor to execute these instructions. Therefore, we need a programming environment to write and compile the code and a tool to upload the code to the microcontroller (the programming). As a programming environment, we chose CodeVisionAVR software. CodeVision is a complete IDE or programming environment that provides us with all the necessary features for developing AVR microcontrollers. In fact, we can even perform the programming within the CodeVision environment, but due to the convenience of use, we used the USB ASP programmer hardware and to avoid the complexities of introducing the programmer to CodeVision, we use a dedicated software for programming our microcontroller, namely ProgISP. The USB ASP programmer is also a very common and widely used programmer that connects to the computer via USB port. If you gain a bit of mastery over the AVR world, you can even build one yourself. Until then, our recommendation is to use ready-made samples available in the market.
Well, after you have installed and activated ProgISP and CodeVisionAVR, you need to download and install the required driver for the USB ASP programmer. The driver installation steps will be as follows:
Installing the USB ASP Programmer driver on Windows 8, 8.1, and 10
If your Windows version is 8 or higher, you need to prepare Windows for driver installation as follows:
First, go to Control Panel / Settings and then go to the Recovery Option section. In this section, under Advanced Startup, click on the Restart Now option.
Before the boot page and loading Windows, you will encounter a blue screen. On this screen, click on Troubleshoot and in the new page, select Advanced Options. In this section, you should select Startup Settings and then click on the Restart button.
After restarting, you will face another blue screen where, according to the page instructions, you need to disable Driver signature enforcement by pressing the 7 key on the keyboard and then enter Windows.
By following the above steps, you can install the USB ASP driver normally on Windows.
To install the driver, connect your programmer to the USB port of the computer. After extracting the compressed driver file, go to the Windows control panel and then to Device Manager. If everything has gone smoothly, you should have an option as shown in the image below:
Right-click on the programmer icon and select Update Driver Software…. In this section, also select the Browse my computer for driver software option.
Now manually enter the address of the folder where the USB ASP driver files are located or specify its path using the Browse option. Make sure that the Include Subfolders option is checked.
You may encounter a warning message from Windows. In this case, click on the Install this driver software anyway option.
If everything has gone well, the USB ASP driver will be installed and you will be able to see your programmer in Device Manager.
Installing the USB ASP Programmer driver on Windows 7
Installing the driver on Windows 7 does not differ significantly from newer versions, with the difference that in Windows 7, there is no need to disable the Driver signature enforcement feature, so you can simply proceed to install the driver through the Control Panel as described.
Testing the Programmer
Well, now that you have installed the programmer driver, it's time to ensure the correct functioning of your programmer and microcontroller. For this, place the microcontroller in the correct direction (so that the semicircle on top is close to the lever of the green socket) on the programmer. Lower the lever to secure the microcontroller in place.
Run the ProgISP software on your computer, and if the programmer is not connected to the computer, connect it.
Now you need to select your microcontroller model from the left menu – top of the software. Make sure that your selected model exactly matches the model registered on the microcontroller. If you have followed all the steps correctly, by clicking on Erase, you should see the message Chip Erased Successfully.
Congratulations!! Your microcontroller is fully ready for programming. But before we delve into programming and compiling the code, let's see what will happen next to our microcontroller.
As we mentioned, CodeVision software is a complete programming environment that allows us to perform all actions related to the development of AVR microcontrollers. However, to avoid the complexities of direct recognition of the programmer by CodeVisionAVR, we preferred to perform the programming with a standalone software.
You probably know that when the codes of a program are written, the compiler translates these codes into the machine language that they will run on and provides an output file to the user. For example, this output file in Windows programs has the .exe extension. In exactly the same way, CodeVision is going to compile the codes we write in C and give us an output file with the .hex extension. This file is a text file with 16-bit content (hex is short for hexadecimal) that is executable for the microcontroller. Therefore, we upload this file for execution via the ProgISP software and the programmer into the memory of the microcontroller. We will thoroughly examine how to work with CodeVision, write suitable codes, compile, and program in the upcoming sessions.
The first session of the training ends here. We hope you enjoyed it and found it useful. Please share your comments, criticisms, and suggestions in the comments section so that we can make this training more usable and beneficial.


سعی میکنیم جلسات آموزش رو هر دو هفته یک بار در بخش مقالات فنی منتشر کنیم.
خوشحالیم که براتون مفید واقع شده. Thank you very much, dear friend :) We try to publish the training sessions every two weeks in the technical articles section. We are glad it has been useful for you.
متشکر از لطفتون :) Hello dear friend, thank you for your kindness :)
ممنون میشیم ادامه کار رو ببینیم.
این بهترین سایتی بود ک دیدم. Dear friend, you are amazing. Very great. Please continue in this style. We would appreciate seeing the continuation of the work. This was the best site I have seen.