در دومین جلسه آموزش کار با میکروکنترلر های AVR، قصد داریم به آشنایی با محیط نرمافزار CodeVisionAVR ، ایجاد اولین پروژه و شروع برنامه نویسی با زبان C بپردازیم.
دانستیم که کدویژن، یک IDE (محیط یکپارچه توسعه) است که امکانات مورد نیاز برای برنامه نویسی و عیب یابی میکروکنترلر های AVR را در اختیارمان قرار می دهد. از نسخه ۳ به بعد، در ساختار کتابخانه های پیشفرض کدویژن تغییراتی در جهت سادگی کدنویسی اعمال شد که در مباحث این دوره آموزشی، مورد استفاده قرار خواهند گرفت. بنابراین، پیش از ادامه مطمئن شوید که از نسخه جدید و به روز این نرم افزار استفاده میکنید. ما از نسخه 3.12 کدویژن استفاده میکنیم.
پس از نصب، فعال سازی و اولین اجرای نرم افزار، با چنین نمایی مواجه خواهید شد. ساختار گرافیکی کدویژن، همانند بسیاری از نرم افزار های دیگر، از بخش های مختلفی تشکیل شده که هر کدام از این بخش ها، در قالب یک پنجره قابل باز و بسته کردن و تغییر موقعیت و اندازه می باشند. مهم ترین بخش های مورد استفاده ما، Code Navigator و Messages هستند.
پیش از ایجاد پروژه جدید، به یکی از مهم ترین امکانات نرم افزار کدویژن یعنی محیط CodeWizardAVR اشاره کنیم. کدویزارد یک محیط گرافیکی برای راه اندازی اولیه و اعمال تنظیمات مورد نیاز به میکروکنترلر است که برای استفاده از آن، نیازی به کد نویسی و آشنایی با زبان برنامه نویسی خاصی وجود ندارد. در واقع، محیط کدویزارد قادر است تنظیمات مورد علاقه کاربر را به صورت گرافیکی دریافت کرده و کد های مناسب را با توجه به همان تنظیمات ایجاد کند و در اختیار کاربر قرار دهد. بنابراین، استفاده از کدویزارد برای راه اندازی سریع پروژه ها و جلوگیری از اتلاف وقت روش بسیار مناسبیست. در ادامه دوره آموزشی، زمانی را به استفاده از کدویزارد اختصاص خواهیم داد.
بسیار خب، حالا میخواهیم پروژه جدیدی را در نرم افزار CodeViosnAVR ایجاد کنیم. ساختار کلی پروژه در کدویژن به این صورت است که فایل های پروژه از چهار بخش تشکیل می شوند:
1- فایل خام و پردازش نشده که توسط کاربر ایجاد شده است. (سورس کد)
2- فایل پردازش شده خروجی با پسوند .hex یا .bin
3- فایل اصلی پروژه که وظیفه ایجادارتباط میان فایل های مختلف را بر عهده دارد.
4- فایل های کمکی و کتابخانه های اضافی.
تمامی فایل های پروژه باید در یک فولدر مخصوص پروژه قرار گیرند.
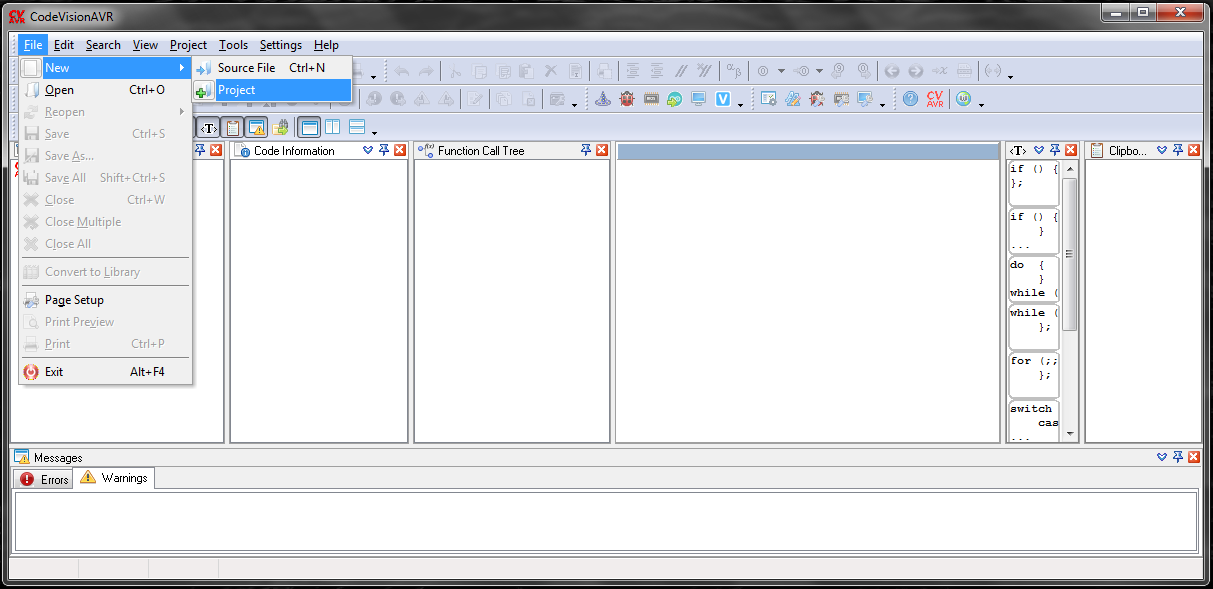
برای ایجاد پروژه، در گوشه بالا – سمت چپ، بر روی منوی File کلیک کرده و از قسمت New، گزینه Project را انتخاب کنید.
در این مرحله، با پیغامی مبنی بر استفاده از محیط CodeWizardAVR مواجه خواهید شد. فعلاً قصد داریم تمامی تنظیمات را به صورت دستی و در قالب کد اعمال نماییم، بنابراین گزینه No را انتخاب کنید.
حالا باید مسیر فولدر پروژه را برای نرم افزار مشخص کنید تا فایل اصلی پروژه در آن ذخیره شود. نام پوشه و فایل پروژه را می توانید به دلخواه انتخاب کنید. سپس روی گزینه Save کلیک کنید.

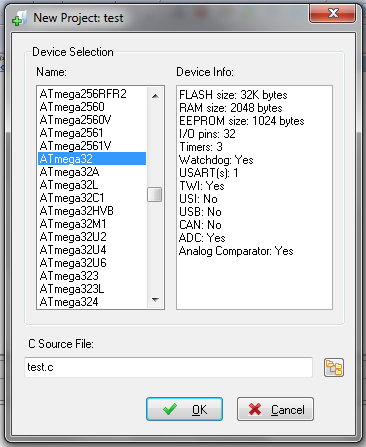
در این مرحله، باید مدل میکروکنترلر و نام فایل ورودی (Source File) مورد استفاده در پروژه را انتخاب کنید. میکروکنترلر ATmega32 را از لیست انتخاب کرده و نام فایل سورس را به دلخواه وارد نمایید و OK را بزنید.
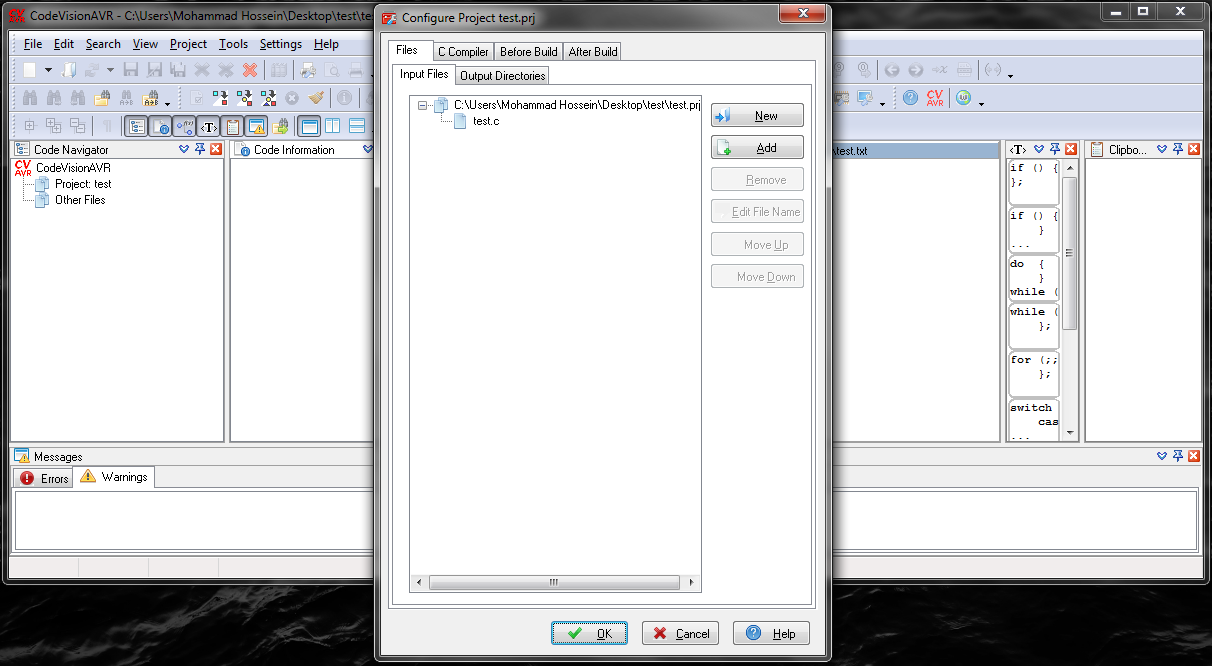
در انتها، نرم افزار به شما موقعیت سورس فایل را در پنجره Project Configure نشان می دهد. OK را انتخاب کنید.
در نهایت، اگر همه چیز به خوبی پیش رفته باشد، با پنجره ای مشابه زیر مواجه خواهید شد:
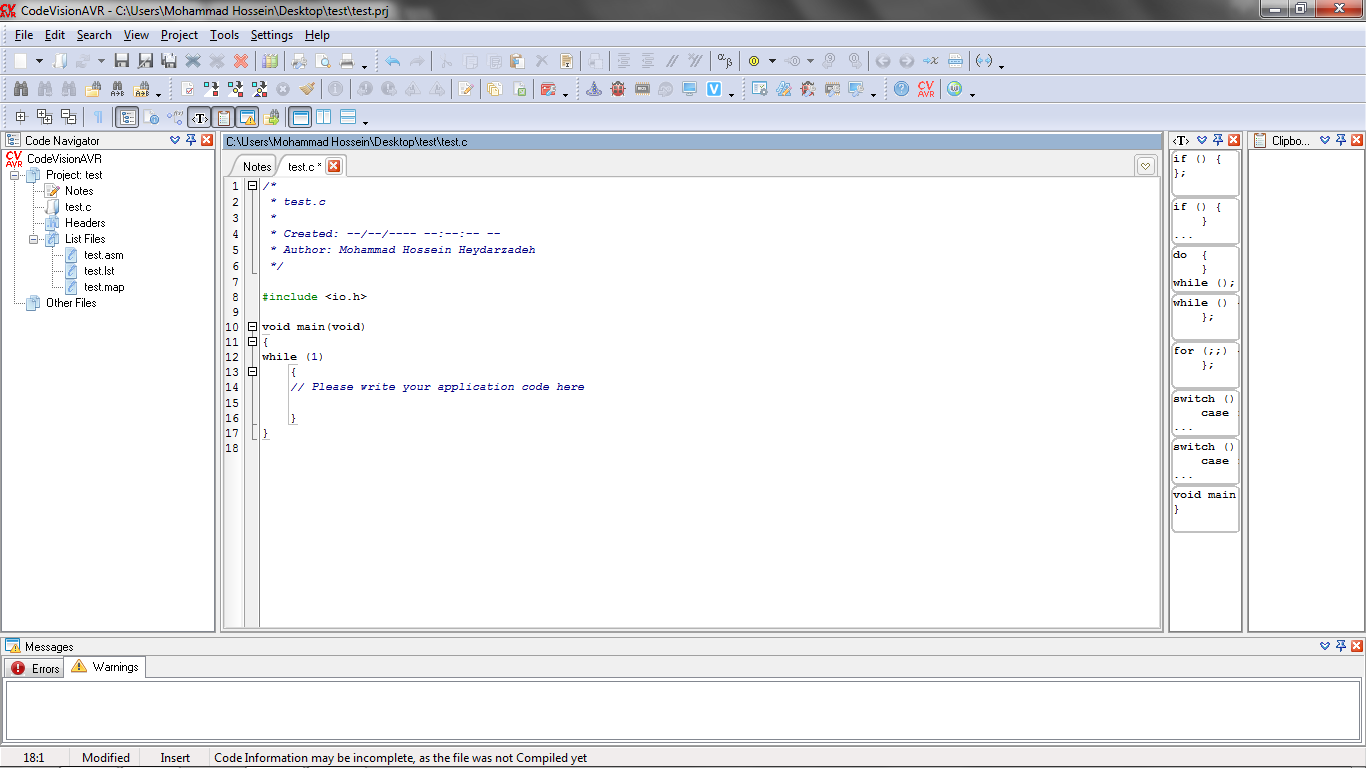
می بینید که خود نرم افزار، بخشی از قالب کد در زبان C را ایجاد کرده و توضیحات اندکی نیز به برنامه افزوده است. برای آزمایش اولیه، کد ایجاد شده توسط CodeVisionAVR را (که البته فعلا هیچ کاری انجام نمی دهد) به حافظه میکروکنترلر آپلود میکنیم.
مطابق آموزش جلسه پیش، یک بار میکروکنترلر را Erase کنید. سپس در نرم افزار کدویژن، آیکن Build All را در نوار ابزار انتخاب کرده و یا کلید های Ctrl+F9 را بزنید. باید با چنین وضعیتی رو به رو شوید:
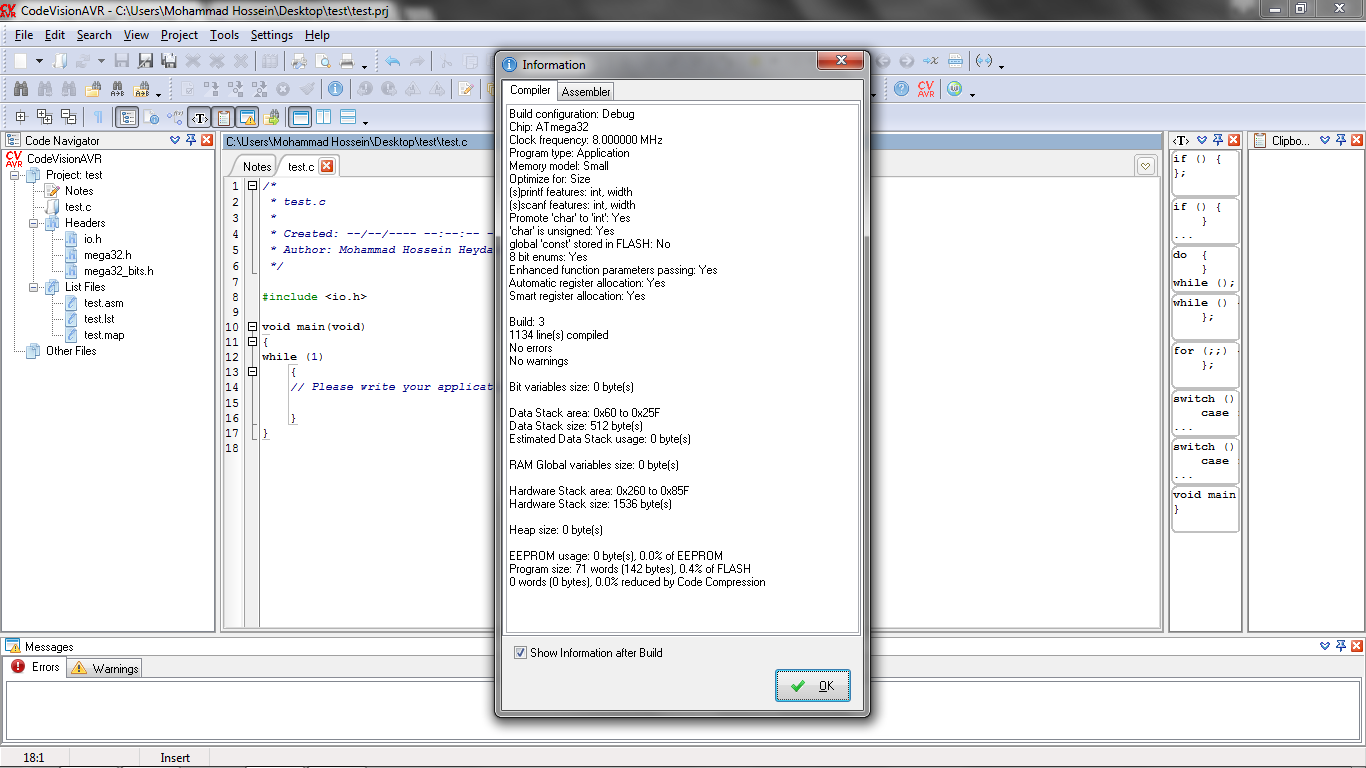
پنجره Information، اطلاعات پروژه را نمایش می دهد. خالی بودن بخش Messages نیز به دلیل نبود هیچ گونه Error و Warning بوده و مشخص می کند که پروژه با موفقیت کامپایل شده است.
حال به نرم افزار ProgISP بازگردید. از منوی فایل، گزینه Load Flash را انتخاب کنید و در پنجره ی باز شده، به مسیر پروژه ای که ایجاد کرده بودید بروید. در فولدر مربوط به پروژه نیر به مسیر Debug و سپس Exe رفته و سپس فایل با پسوند .HEX را انتخاب کنید. حال با کلیک بر روی گزینه Auto، فایل پروژه به حافظه میکروکنترلر منتقل می شود.
این هم از دومین جلسه آموزش کار با میکروکنترلر های AVR. امیدواریم این جلسه برایتان مفید بوده و از آن لذت برده باشید. فراموش نکنید که حتماً با نظرات خود ما را در جهت بهبود این دوره آموزشی یاری کنید. تا جلسه بعدی، بدرود!
In the second training session on working with AVR microcontrollers, we intend to familiarize ourselves with the CodeVisionAVR software environment, create the first project, and start programming in C language.
We learned that CodeVision is an IDE (Integrated Development Environment) that provides the necessary tools for programming and debugging AVR microcontrollers. Starting from version 3, changes were made to the structure of CodeVision's default libraries to simplify coding, which will be utilized in this training course. Therefore, before proceeding, make sure you are using the latest updated version of this software. We are using version 3.12 of CodeVision.
After installation, activation, and the first run of the software, you will encounter such a view. The graphical structure of CodeVision, like many other software, consists of various sections, each of which can be opened, closed, and repositioned. The most important sections we will use are Code Navigator and Messages.
Before creating a new project, let's refer to one of the most important features of CodeVision software, which is the CodeWizardAVR environment. CodeWizard is a graphical environment for initial setup and applying the necessary settings to the microcontroller, which does not require coding or familiarity with a specific programming language. In fact, the CodeWizard environment can graphically receive the user's preferred settings and generate the appropriate code based on those settings and provide it to the user. Therefore, using CodeWizard for quick project setup and preventing time wastage is a very suitable method. In the continuation of the training course, we will dedicate some time to using CodeWizard.
Alright, now we want to create a new project in the CodeVisionAVR software. The overall structure of a project in CodeVision consists of four parts:
1- The raw and unprocessed file created by the user. (Source code)
2- The processed output file with the .hex or .bin extension
3- The main project file that is responsible for establishing communication between different files.
4- Auxiliary files and additional libraries.
All project files must be placed in a specific project folder.
To create a project, click on the File menu in the upper left corner and select Project from the New section.
At this stage, you will encounter a message regarding the use of the CodeWizardAVR environment. For now, we intend to apply all settings manually and in code form, so select No.
Now you need to specify the project folder path for the software so that the main project file is saved there. You can choose the folder and project file name as you wish. Then click on the Save option.
At this stage, you need to select the microcontroller model and the input file name (Source File) used in the project. Select the ATmega32 microcontroller from the list and enter the source file name as desired, then click OK.
Finally, the software will show you the location of the source file in the Project Configure window. Select OK.
In the end, if everything has gone well, you will encounter a window similar to the one below:
You can see that the software itself has generated part of the code template in C language and has added some comments to the program. For an initial test, we will upload the code generated by CodeVisionAVR (which currently does nothing) to the microcontroller's memory.
According to the previous session's tutorial, erase the microcontroller once. Then, in CodeVision software, select the Build All icon in the toolbar or press Ctrl+F9. You should face a situation like this:
The Information window displays the project information. The empty Messages section indicates that there are no Errors or Warnings, confirming that the project has been successfully compiled.
Now return to the ProgISP software. From the file menu, select Load Flash and in the opened window, navigate to the path of the project you created. In the project folder, go to the Debug path and then Exe, and select the file with the .HEX extension. Now, by clicking on the Auto option, the project file will be transferred to the microcontroller's memory.
This concludes the second session of training on working with AVR microcontrollers. We hope this session has been useful and enjoyable for you. Don't forget to help us improve this training course with your feedback. Until the next session, goodbye!


خیلی ممنون
کاش یه منبع دیگه که آقای محمدحسین حیدرزاده توصیه میکنن معرفی کنید
که از اونجا ادامه بدیم یادگیری AVR رو Hello
Thank you very much
I wish you could introduce another source that Mr. Mohammad Hossein Heydarzadeh recommends
so we can continue learning AVR from there.